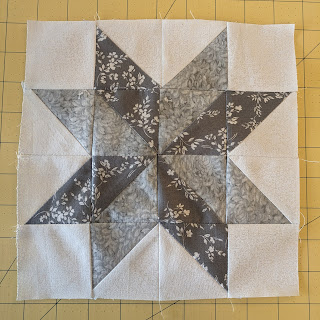
The LeMoyne Star Block, easy step by step
The LeMoyne star, also called the Lemon Star, looks as complicated as the name, but we will make it easy! First, this is what you need for one of my LeMoyne Stars:
The fabric:. A Fat Quarter of each is a generous amount
1 Background Solid, mine is white.
2 Medium Prints, OR contrasting solids.
For our purposes, they will be labeled BG (back ground) P1 (print 1) and P2 (print 2).
The entire star consists of twelve 2 1/2" HST's (half square triangles) and 4 solid blocks. Our block will finish at 8".
Cutting:
Cut two 6 1/2" squares each of P1 and P2.
Cut two 6 1/2" squares of BG
Cut four 2 1/2" squares of BG
Let's make the HST's. Here is the roughly drawn chart I go by when I'm making 2 1/2" HST's
I will be using the 6 1/2" square grid to make 8 of each BG + P1 and Bg + P2, and P1 + P2. Yes it will make 8 of each but I will end up making more blocks with these. First draw a 3" grid on the back of the lightest fabric of both sets of fabric... In my drawing, I make a 3" grid, which is comfortable for me and I'm not worried about the squares being too small. The formula actually is make your grid at 7/8" larger than the measurement you want your finished square. So, we want 2" finished squares (2 1/2" unfinished), so the perfect grid for us would be 2 7/8 inches. Drawing it at 3 gives us a little wiggle room. I drew this one at a scant 3" hoping for less trimming.
Draw your Grid on the back of the two BG 6 1/2" squares and on the back of the lightest Print Square:
Now I'll draw the sewing guide lines:
Now it's time to sew! The black sewing lines are your guide. Sew 1/4" on each side of the black diagonal lines. I first sew on the outside of the line all around the inner square, then sew 1/4" from the line on the inside. I wish I had used a darker color but I think you can see the seam I made...
Now it's time to seperate and iron your squares open. First, cut the graphed pieces apart on all the lines. Remember, the lines I've drawn in blue are the outside of the half square triangle. To keep your measurement as accurate as possible, cut right on the line!
Now take them to the ironing board and let's lay out the block.
I chose to sew the center pinwheel together first. Then I sewed the other bits together.
You can see in this picture how I pressed them.
Your almost done! Now finish sewing the rows together and give it a final press and you have a beautiful LeMoyne Star!


Comments
Post a Comment